
Shadows, Sunshine and Flash
 This is going over old ground somewhat, but I think that given a second and third example of techniques discussed before and combined here you start to get a deeper understanding of how various techniques can be intertwined.
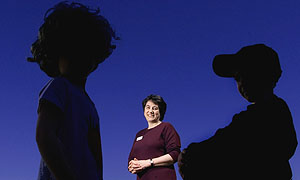
The brief for this photograph was simple: A portrait of a School’s nursing sister who specializes in bereavement with children who are not clients of hers and cannot be identified.
The original idea was to have the nursing sister standing absolutely still and have the children running around and therefore blurred. Unfortunately the weather got in the way and harsh direct sunshine made shutter speeds long enough to achieve a blur virtually impossible.
Another case of “the best laid planned of mice and men….” The school playground was southeast facing, with a big area of shadow covering a large part of it. Fairly quickly I decided that the children would need to be in silhouette and the options for the light background were the concrete surface of the playground and the deep blue sky.
Using the floor would have meant raising the children up to a fair height – which wasn’t particularly safe, so the sky won with no fight.
The first step towards achieving the desired image is to visualize how the final photograph should look. I imagined the children facing one another against the sky, with the nurse well lit all shot on as long a lens as I could get away with. Inevitably this meant being face down on the floor (again).
The next step was to get my Lumedyne flash ready and to put a 70-200 f2.8 lens on one of my DCS520s and my 28-70 on the other. At this point I started to take light readings with the camera et to 200 ISO, firstly from the sky (1/250th at f8) and then the children in deep shade (1/60th at f4). At this point I had intended to place the nurse in the sunshine and expose her with available light, just using the Lumedyne as fill-in flash so the reading for her was the same as the sky. I placed the flash at a distance of eight feet from her on 50 joules (watts per second) at 30 degrees from the axis of the lens. This gave a flash reading of f5.6, which would fill the scene in at minus 1 stop.
Lying flat on my face I still wasn’t low enough to get all three of them properly against the sky without some of the school outbuildings getting into the bottom of the shot whilst using a long telephoto lens. This meant that the distance between the children and the adult was too great when using a wider lens. I couldn’t move the children further away so it meant moving the nurse closer, which brought her half into the shade. This meant a change of plan.
I turned the power of the flash up to 200 joules which gave an aperture of f11. This left the sky one stop under exposed which was just right and the children were five stops underexposed, leaving them in full silhouette. It meant that the adult was lit entirely by flash, which wasn’t what I originally intended but the balance looked great on the LCD screen so I went with that exposure and tried a variety of compositions until I arrived at this shot on my 17-35 f2.8 lens set to 20mm (32mm).
Three elements, children adults and sky. Three different exposures that had to be balanced. Once you get the hang of balancing various elements there is no limit to the effects that you can achieve. LCD screens give us huge advantages over film shooters who didn’t have the time/budget/equipment to shoot Polaroid and I for one intend to make full use of that advantage.