
Flash and Blur 2
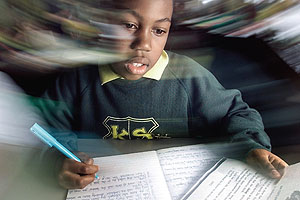 This classroom shot was made for a story about inner city schools performing well academically. It needed to stand out from other school images and the light in the room was poor. There were also a dozen adults in the room – all of whom I needed to keep from my picture.
The light in the room was very poor. At 400 ISO the exposure was 1/45th at f2.8 so there needed to be some flash in there somewhere. The space was a little limited so I decided to light the child with a Canon 550ex speedlite on a small Manfrotto stand.
The flash had a Sto-fen Omni Bounce on it, powered by a Quantum Turbo battery pack which I triggered with a Canon ST-E2 transmitter. The beauty of this flash set up is that you can cut the power right down and work with relatively wide apertures – working with TTL flash if you want to, or manually like I chose to do. My main reason for using manual on the flash was that I was using a wide (17-35 f2.8L lens) and the E-TTL control in this situation isn’t as predictable as using a combination of manual exposure and the LCD screen when so little of the frame is filled with the main subject.
1. To get the kind of shutter speed that I needed to to achieve the right amount of blur I had to stop the lens down a little. I started at f8, which gave a shutter speed of about 1/3rd of a second to correctly expose the scene at 200 ISO.
2. Having shot a couple of frames with the 550ex on 1/8th power I decided that the background was a little too intrusive on the image, so I set the shutter to 1/4 of a second and the lens to f11. This allowed the background to be about one stop underexposed.
3. The very bright areas of the frame still showed brightly and with the movement of the camera from top right to bottom left the highlights blurred nicely. The effect of blurring highlights spreads the light over a larger area, which effectively dulls them. To counteract this I slowed the shutter speed back down by half a stop to 1/3rd.
4. A few frames later I had moved the camera during the exposure in pretty much every direction and I had a variety of images to edit back at my Mac’.
There are many ways that you can vary this technique – changing the direction of the camera movement, the degree of background underexposure and the length of time that the shutter is open are just three. You can also zoom or de-focus the lens. The possibilities are almost endless. It’s a technique that deserves experimentation.