
Choosing The Mood
 Every time you take a photograph you are saying something about what is in the image. It’s impossible to avoid a frozen frame being anything other than an interpretation of that moment so it becomes a mark of a good photographer to make sure that every element of the image (composition, subject matter and light) helps to paint a consistent story.
The mood required for every image – especially with portraits – is something that you have to consider very carefully.
Some lighting guides will tell you that there is a lighting set up for each mood and that it is a simple matter of placing light A in position B and light C in position D to achieve this. I have to agree that there are some obvious starting points for many of the moods that I use, but there are many other factors that have to be taken into account when setting the scene.
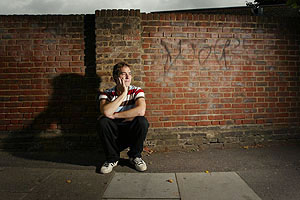
Even a short list of variables such as time of day, age of subject, subjects clothing and location mean that there can be no such thing as a standard lighting rig. This portrait of a teacher who feels that he wasn’t prepared during his training for the attitude of pupils needed a lot of thought.
We met at his home in a pleasant London suburb and I was determined to give the whole portrait a real inner city feel. I asked him if there were any dark alleys or heavily graffitied walls near his home but he couldn’t think of any. We got back into my car and went in search of a location, being very careful not to identify the location in the photographs. We found this shady wall with a small amount of graffiti and parked the car. It was an overcast, if bright, late morning by this time so I decided to add to the “street” atmosphere by using a strong side light.
My subject was just about the same height as the wall so I decided that he needed to be crouching or sitting down. I set up a single Lumedyne 200 w/s (joule) pack and head without either an umbrella or soft box on a stand at about sixty degrees from the lens axis and about ten degrees above eyeline. The flash was set to maximum power at a range of seven feet (2.1 metres) which, combined with a 1/250th shutter speed, made the available light unimportant. The aperture was f11 at 200 ISO and I shot a few frames with just the subject and the wall immediately around him. When I consulted my LCD screen I liked the shadow and decided to include it more obviously in the composition.
My subject appeared more relaxed looking out of camera so I asked him to fix his eyes on a point in the distance between me and the flash. I also asked him to rest his head in his hand and this gave the shadow a better defined shape. I shot a few more frames and then changed the composition to include some of the grey sky. The sky at 1250th at f11 was very dark so I changed the shutter speed to 1/125th and the sky was a better tone.
I shot quite a few variations after this, including some safe images without the obvious flash but this was my favourite frame when I came to do the edit an hour or so later. The mood was about right, it conveys the slightly dark theme of the article and screams “street” at you. I’m very pleased with end result, although this wasn’t the frame chosen for the paper!