
The View From Above 2
 In a remarkably similar composition to the previous technique page this example uses some ambient light with it’s own very strong colour to give an unusual atmosphere whilst adding enough flash light to keep the subject’s skin tones correct.
You would be correct in guessing that orange is one of my favourite colours when it comes to both graphics and photographs. It works well when converted to CMYK for newspaper and magazine reproduction and carries over very well as a web safe colour on the Internet. It also has the advantage of being the colour that that many types of incandescent bulbs show up when you shoot with a daylight balanced digital camera or film. The colour temperature of most household bulbs ranges from around 3000K to 3600K, but certain types of industrial lighting is even warmer at around 2800K.
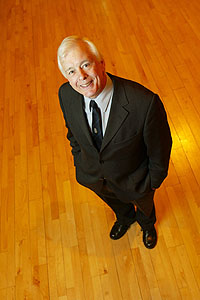
The wooden floor had just been polished to a wonderful finish and, just like last month’s technique, I decided to get up high and shoot down. The only problems that this presents are; a) getting myself high enough, and b) getting the light high enough.
The first of these two dilemmas was easily overcome by using a large gymnastic stool (a bit like the stools that elephants stand on in the circus) that was already in the room. This put me about 1.2 metres (4 feet) up in the air.hildren to use as backgrounds or as props so the images needed to concentrate on the subject. My initial reaction was to shoot pictures outside the school with out of focus buildings, trees and the sky as my backdrop. Many of the images in the first part of the hour that I spent making portraits used light outdoors with underexposed skies but the flat ambient light wasn’t allowing me to get the contrast required to make that particular technique “zing”.
I decided to move indoors, and given the free reign of a whole school building my instinct was to try the school assembly hall which doubles as a gymnasium. There was virtually no daylight coming in because the curtains were all closed.
I had my usual Lumedyne kit with me, along with a 60cm x 90cm (24″x36″) Chimera soft box. I extended the Manfrotto 060 stand to it’s maximum height and attached the softbox to the Lumedyne Signature head. The 200 w/s pack was attached to the base of the stand to give a little more stability and before climbing back on to my “elephant perch” I took some light readings for the flash with an incident meter and the floor through the camera. It’s always at this point that the mental arithmetic and exposure compromises take place and I was faced with an ambient exposure on the floor of 1/30th of a second at f4 on 200 ISO and a flash exposure at the subjects eye level of f5.6 at 200 w/s. The flash was at a height of nearly 8 feet (2.4 metres) and at angle of about 30 degrees from the axis of the lens to my left. I asked my subject to face the softbox with his body and then turn his head back to look straight into the lens.
The vital part of this image was to get the subject’s face and eyes sharp, with no hint of blur or movement so I decided to play safe and underexpose the available light by one f-stop. This brought the ambient reading to 1/30th of a second at f5.6 which tallied perfectly with the metered flash reading. Things were looking good, so I climbed back on to the stool with a 24-70 f2.8 lens on my Canon EOS1D. Once in position and looking through the camera I could see that the lights in the room were producing some interesting highlights on the wooden floor so I asked my subject to move back about 12 inches (30cm) so that one of them was just behind his arm – almost exactly where I felt that any slight shadow from the flash would fall.
This movement back from the flash didn’t require the angle of the softbox to be changed, but it did mean that I would have to alter the exposure slightly. It turned out to only make 1/2 a stop difference to the flash reading so I set the aperture to f4.5 and adjusted the ambient exposure by the same amount by changing the shutter speed to 1/45th of a second. My cameras have the option of 1/2 or 1/3 stop exposure increments but I find that 1/2 stops on both the shutter and aperture suit the way that I work better. The rest of the shoot was fairly plain sailing as I tried a variety of angles, heights and positions for my subject. This was actually the last vertical frame that Is hot before trying some horizontal compositions.
By underexposing the floor by one stop, I was able to intensify the orange light. The floor was a slightly yellow pine colour to start with but by using the strong tungsten colour shift with a daylight white balance I got the effect that I wanted. This technique can be used in all sorts of situations where you only have a single flash unit, but want a strong coloured effect.