
Two Minute Still Life

As a working news photographer, the one job that I dread is the “quick product shot” that I am often asked to do without access to a properly equipped studio. For most of the year it only happens once a month or so, but very occasionally I’ll get a run of requests. It helps to have a few standard tactics up your sleeve.
These two shots ere booth for a special “e-supplement” that we did. A special edition about the use of technology in higher education and the feel of the supplement was magazine orientated rather than the usual newspaper style that we are all used to working with.
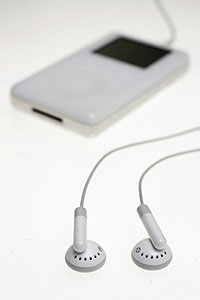
The two pictures were taken a few days apart and that made having a reasonably consistent approach more important. The first to come up was the iPod picture and the brief was blazingly simple – a nice upright picture of an iPod that wasn’t a catalogue product shot and that didn’t scream APPLE at you. I was handed the iPod in the office and told that I couldn’t take it away, which was unfortunate because I often do these small still life pictures at home where there is a lot more room to play around. I decided to go for the old “white on white” routine and started to play around with the iPod on a large light box that we have in the corner of the office for those rare occasions when anyone has a transparency (remember them?) to look at. With the light box switched off the plexiglas surface has an interesting reflection of what’s sitting on it and with the light box switched on you get varying degrees of shadowless light. I decided to use the shadowless light and add enough light of my own actually on the player to balance out the two elements.
In the pre-digital days this would have meant a lot of bracketing of the shutter speed and aperture but with the advantage of the LCD screen you can see what’s happening pretty accurately. The light coming from the box at 200 ISO was 1/125th at f2.8 and the thought of restricting the depth of field came to me. This is always a useful tactic when shooting close up anyway because getting a high enough depth of field to get everything sharp is always going to be a struggle without a monorail camera and all of the bellows movements that they have. I stuck a Canon 50mm f1.4 lens with a 14mm extension ring on my camera and started to weigh up the various options. My first action was to get some light coming don onto the iPod and so I set up a 40″ (1 metre) circular reflector about 40″ above the lightbox (a useful distance, dictated by the height of a nearby shelf used to prop it in place) with a single lighting stand propping the other side. I then placed a single Canon 550ex flash gun set to 1/4 power manual and triggered with a Canon ST-E2 pointing up at the reflector to give an even light over the subject. The flash gave me a correct exposure at f2 and that meant if I shot on 200 ISO at 1/250th of a second I would get both thee light box and the product correctly exposed. I bracketed a stop either way on both the aperture and the shutter speed just to be safe and by working with such a wide aperture on such a sharp lens I achieved the result that you see above.
Two days later I was asked for an image with a similar feel that showed a computer keyboard and focused on the “£” sign. This was about finance and IT so I decided to use the same shallow depth of field technique, the same lens and similar light. The keyboard is that of an Apple iBook to complete the similarities. I wanted to add some colour to move away from the white on white look and the simplest way to do that is to shift the white balance. By using the flash with no coloured gels and setting the camera to a tungsten white balance you will always get a heavy blue cast. This is what I did, although the lighting set up was very different. I wanted to add extra emphasis to the 3/£ key by putting a small spot of light onto it and letting the rest go darker. Using an old poster tube taped to the end of a 550ex and propped in place with various boxes and clamps so that it came in from the left of the shot at a very low angle I managed to get the desired effect. I played around for many shots until I decided that the blue needed to be more intense and so I set the white balance on the camera down to 2500 degrees which did just that. I tried getting the light coming from other directions and angles as well as trying some with the camera set to 10000 degrees white balance to give the scene an orange glow. This is the beauty of way of working – you can try out dozens of ideas in very quick time and present a varied set of images to the editor without actually having to change much.
I didn’t become a photographer to do this kind of work, but it’s part of my job and I hate to do anything other than the best work that I’m capable of. I had a great grounding in all forms of photography at college and nearly twenty years later i still find myself referring to those basics.