
More About Shooting Glass
Photography couldn’t exist without glass. Lenses are reliant on it for their optics and mirrors use it too. We all love our LCD displays on our digital cameras, but when we are actually photographing glass many of us turn to jelly. I have written before about shooting through it, but a job that I shot this month involved shooting a big glass jar.
When I was sent to photograph this school laboratory assistant I was given a pretty free reign to do what I wanted.
The Picture Editor had told me that we already had some “straight” pictures of her on file so I could be as creative as I liked. That’s sometimes a bit of a poisoned chalice, but I’m always up for a bit of a challenge so I decided to try to do something a bit different.
When I arrived at the school, I met the lady I was photographing and was taken to her small preparation room next to the main laboratories. It’s always at this point that I start looking for clues about what to include in the photograph and the room was full of glassware. Test tubes, beakers and conical flasks were everywhere so I decided that glass was needed in the images.
We also had the luxury of an empty lab to shoot in so asked my subject to make up some nice brightly coloured liquids in big flasks. At this point she opened a cupboard to reveal some samples that she had ready for a class to use that afternoon in vivid red, blue, green and orange.
We took our samples into the lab where there was a huge white marker board at one end. I thought that I would either use this simple background or the equally simple black blinds in my shots and I set up my Lumedynes ready to use either.
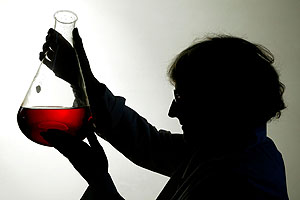
Glass presents many problems with reflections and the deep joy of digital is that you can monitor them on the LCD as you work, eliminating nasty reflections as you go. The classic way to light glass is from behind with a big diffuse light source and a massive white board works well as such a light source. I quickly decided that I would try a silhouette of the lady with a beaker full of red liquid in her hands so I set up a single Lumedyne head pointed at the white board. I have written many times before about how to create silhouettes so I won’t repeat myself eexcept to point out that by lighting the white board I could create with a single light the conditions for a near perfect backlit glass shot and a near perfect silhouette. I tried a frame with the shuttter speed right up at 1/250th and the aperture at f8 on 200 ISO with the Lumedyne set to 100 joules (100 w/s) and a simple diffuser cap over the standard reflector. The light was only about a metre (40″) from the white board so the spread of light wouldn’t be too even. I wanted some gradation of the brightness over the white board area.
My first test shot looked OK. The gradation was from bottom to top with the lower half of the image being the lightest. I wanted there to be some white in the frame so I had to either move the light or open up the aperture. I opened up to f5.6 and tried another frame. The flask was heavy so I allowed my subject to put it down between test frames and she was very good at getting it back to the same raised position when asked to do so. The exposure was now about right, but I didn’t like the top to bottom gradation of the light. It didn’t allow the redness of the liquid to show as brightly as I wanted so I decided to use a side to side gradation instead.
I moved the Lumedyne head so that it was off to my left and about a metre from the white board. I pointed the centre of the light directly behind the flask and tried another shot. It still wasn’t quite right so I got some black paper, made an open ended (opening about 10cm or 4″) cone from it and taped it over the light to form a “snoot”. This allowed me to point the light more accurately and gave the degree of fall off that I wanted. Now f5.6 was a little too dark again so I put the power up to 200 joules (200 w/s) and shot another test. Everything now looked correct, so I shot a variety of images with various head angles and arm positions, always keeping the flask over the point where the light was strongest.
I tried a few other ideas, but this was the strongest and the Picture Editor who had asked for creative backed my choice of image when the time came to talk to the editor and designer about which image to use and how to use it. As they used to say in “The A-Team”….”I love it when a plan comes together!”