
Still Life and Movement
 One of the things about being a staff photographer is that you often get asked to shoot little still life images, in the corner of the offices with very little space and even less equipment. Add short notice to that cocktail and producing pictures to be proud of becomes rather tricky.
Coming up with interesting images to illustrate rather academic or vague stories presents all sorts of problems. A lot of these kinds of pictures get sourced from stock libraries, but it’s often the case that there is nothing entirely suitable available at a price that’s worth paying.
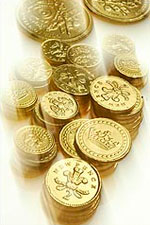
The picture editor had been out shopping to find some toy money and with the approach of Christmas there was a lot of foil covered chocolate money in the shops. She bought both the plastic and the chocolate so that I would have all sorts of options when I came to play around with lights and lenses.
Neither the picture editor or myself had read the story when we started, so I decided to give her a range of pictures that would not only be useful for this story, but also have other uses in the future. I keep a couple of Elinchrom 250 monobloc flash heads in a cupboard in the office along with stands and a 70cm softbox for these occasions so I commandeered some space and started to play.
Regular readers of this site will know that I have a few stock techniques that I often resort to and my first reaction to this job was to think that for once none of them would help me out here.
I started to think that I needed to shoot down on the coins, so I needed a background. Rather than clutter up the office rolling out white seamless paper I placed the foil covered chocolate coins on a 30″x20″ (75cm x 50cm) lightbox. About two feet over the lightbox I placed a flash head with a 70cm softbox on it so that it would pick up plenty of the white and give a decent highlight on the shiny foil coins. At this point I shot a few test frames with a 28-70 f2.8L lens having metered the 1/4 power flash at f19 on 200 ISO. The coins looked good, picking up the carefully angled light which was slightly behind and above them.
At this stage the picture was looking OK and I shot a range of shapes, coin arrangements and compositions so that the designer would have lots of pictures to choose from when the words appeared. I found the whole image a little bit boring though, so I started to think about how to turn a still life into a photo of an inanimate objects with movement and life. The answer was really simple – turn the lightbox on and allow the white light to flood through the coins. I shot a frame with the shutter speed at 1/30th of a second and the white showed through a little. I then went down to 1/10th of a second and the white flooded through. This was a much cleaner and fresher look, but still lacking something. At this point an old favourite technique came to my (creative) rescue.
Two previous technique examples have discussed the combination of ambient light and flash. The basic idea of flash and blur is to use a relatively long shutter speed in the background and light the foreground with motion freezing flash. I had established that f19 was the correct aperture to get the proper flash exposure on the coins, so the whole exposure had to work around that f19 figure. The basic rule is that aperture controls flash and a combination of aperture and shutter speed controls the constant light exposure. To get the whole scene right I decided to try shooting at the same exposure that I finished the uninteresting images with. I needed to deliberately move the camera during the 1/10th of a second that the shutter would be open to get the light from the lightbox to blur over some of the flash lit coins, but not across all of them. The direction of camera movement is never an exact science so I use the LCD screen on the back of my camera to look at frames that I’ve shot and alter the direction of movement accordingly.
Because it is possible to choose which direction the blur is going to take, I find it much more satisfactory to have the flash fire at the beginning of the exposure rather than use “second curtain” flash synch. The reason for this is to make sure that I have control over the composition at the start of the image rather than try to guess where it will be at the end.
Having shot at 1/10th for a few frames with movement in all directions I decided that I wanted to have a bit more light blurring so I went to 1/6th of a second, which overexposes the white by a full f-stop. I also decided that I needed to move the camera up and to the left as soon as the flash fired. By this time I was using my 28-70 f2.8 lens at it’s widest setting because the slight wide angle distortion added to the feel of the image.
With this kind of job, there isn’t one finished picture. The picture editor had a wide variety to choose from, but the picture at the top of this page was my personal favourite. The light from the lightbox is far from the usual point source of light that I’d recommend for a flash blur image, but the fact that you only get glimpses of it between and around the coins makes it almost the same as point sources and gives the right effect.
Digital is great for jobs like this. You know that you’ve got something that’s good as soon as you’ve shot it and the fact that the picture desk and design teams devoured the chocolate coins before the lights were packed away made a re-shoot impossible anyway!